Configure decision tables
You can build and refine decision logic by adding inputs, outputs, and rules to your tables. You initiate a table from the Design tab and then define its specific logic — including Hit Policies and Data Types — within the Logic tab.
Create a decision table
Decision and Business Knowledge Model elements support decision tables. Tables are created in the Logic tab with a default input and output. You can add multiple inputs and outputs to the table.
You create decision tables in the Design tab.
-
In the diagram, select a Decision or a Business Knowledge Model component.
-
In the right-menu of the Ring, click
 .
.
The element now displays a decision table marker.
Define inputs
Inputs are represented as columns. Every input can have multiple input entries.
You define an input in the Attributes panel.
To define an input:
-
Select an input in the table.
-
In the Configuration panel, open Attributes.
-
Define the input by completing these attribute fields:
| Attribute | Description |
|---|---|
| Description | A description of the input. (Optional) |
| Input Expression Text |
The name of the input. |
| TypeRef | The data type of the input. |
| Label | A description of the input expression. (Optional) |
| Input Values Text |
Values can be FEEL expressions or defined data type values. |
Define outputs
Outputs are represented as columns. Outputs can have several output entries.
You define an output in the Attributes panel.
To define an output:
-
Select an output in the table.
-
In the Configuration panel, open Attributes.
-
Define the output by completing these attribute fields:
| Attribute | Description |
|---|---|
| Output label | The name of the output. |
| Description | A description of the output. (Optional) |
| TypeRef | The data type of the output. |
| Output Values Text |
Values can be FEEL expressions or defined data type values. |
| Default Output Entry Text |
In an incomplete table, this lists output entries that can be set as default when no rules match. |
Add inputs and outputs
New inputs are added in the last Input column of the table. New outputs are added in the last Output column of the table.
If you’ve selected an existing input/output in the table, you’ll be give the option to add the new input/output to the right or left of the selected input/output.
To add an input or output to the decision table:
-
In the toolbar, click Add Input or Add Output.
-
Define the input/output in the Attributes panel.
Move inputs and outputs
You can change the order in which inputs and outputs appear in the column by moving them left or right.
- In the toolbar, click Move Input or Move Output, then select Left or Right.
Delete inputs and outputs
-
Select the input/output you want to delete.
-
In the toolbar, click Delete Input or Delete Output.
Specify rules
Rules are expressed as rows within a table. Generally, a decision table will consist of multiple rules with every rule consisting of one or more input entries and a corresponding output entry.
Add a rule for each possible scenario of an input and output. The end result will be a decision table with all the relevant scenarios for the decision logic.
You can use FEEL expressions or any defined data type as entries. Make sure that the type of values you include is consistent with the data type of the input/output.
When you add a rule a new row is added at the bottom of the table. If you’ve selected a rule in the table, you’ll be given the option to add the new rule above or below the selected rule.
To add a rule:
-
In the toolbar, click Add Decision Rule.
-
In the Configuration panel, open Attributes.
-
Define the input and output entries by completing these fields:
| Field | Description |
|---|---|
| Text | The value of the input or output entry. |
| Description | A description of the input or output entry. (Optional) |
Move a rule
You can change the order in which rules appear in the table by moving them up or down.
- In the toolbar, click Move Rule, then select Up or Down.
Delete a rule
-
Select the rule you want to remove.
-
In the toolbar, click Delete Rule.
Define a Hit Policy
A decision table usually has several rules. If these rules overlap — more than one rule matches a given set of input values — a hit policy selects the proper output value. The output value can be a single value or a list of values.
There are two types of hit policies: Single Hit and Multiple Hit.
Single hit policies produce one result per input. Only one rule is applied at a time, even if several rules exist.
Multiple hit policies produce a list of outputs. All applicable rules are considered regardless of their position in the table. The resulting output can be a list or aggregated to a single value.
These are the hit policies:
| Hit Policy | Description |
|---|---|
| Unique (U) Single Hit |
Only one rule can match. Overlapping rules represent an error. This is the default policy for new tables. |
| First (F) Single Hit |
Overlapping rules may have different output values. The policy selects the first matching rule. |
| Priority (P) Single Hit |
Overlapping rules may have different output values. The policy selects the one with the highest priority based on the order of allowed values. |
| Any (A) Single Hit |
Rules may overlap, but only if their output values are the same. Inconsistent output values will result in an error. |
| Collect (C) Multiple Hit |
Collects all matching outputs. Can be configured to determine the sum, minimum, maximum, or count of matching outputs. |
| Rule Order (R) Multiple Hit |
Returns all matching results in the order they appear in the table. |
| Output Order (O) Multiple Hit |
Returns all matching results ordered by the priority of the output values. |
Define the Hit Policy
-
In the Configuration panel, click Attributes.
-
In Hit Policy, click
and select the policy from the dropdown list.
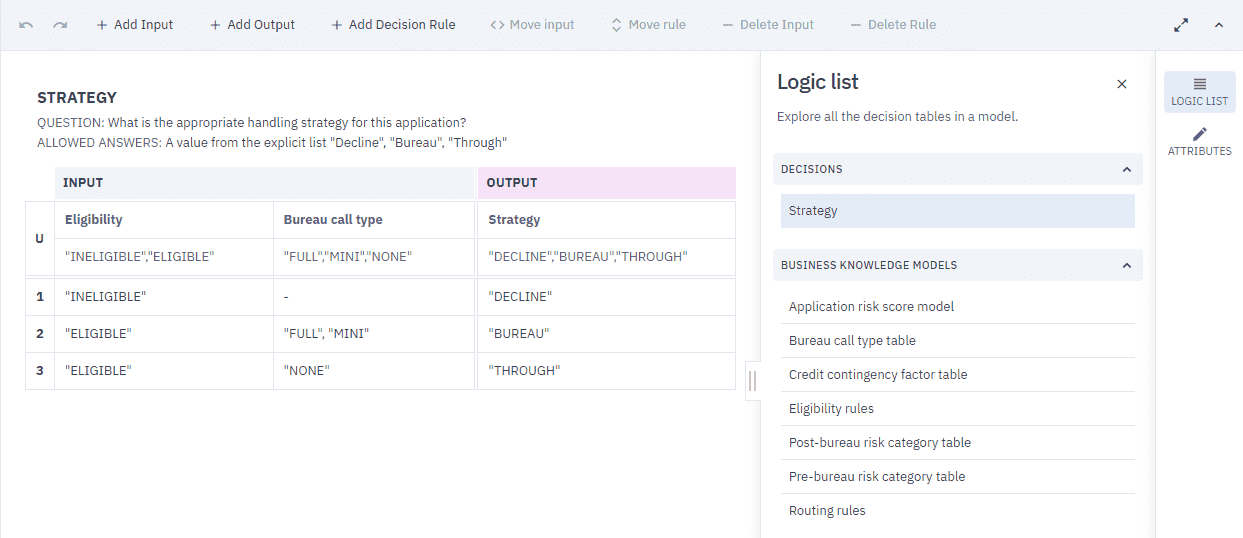
View the logic list
The logic list enables you to explore all the decision tables in a model. The list is divided into two sections — Decisions and Business Knowledge Models.
To view the logic list:
- In the Configuration panel, click Logic List.
Delete a Decision Table
-
In the Design tab, select the Decision or a Business Knowledge Model element displaying the
icon, and in the right-menu of the Ring, click  .
. -
In the dialog box that opens, click Delete.